31 July 2024

International Image Copyright Law

International Image Copyright Law: Awareness and Resources
International Image Copyright Law
"International image copyright law is a complex area that encompasses various treaties, agreements, and national laws aimed at protecting the rights of creators and owners of visual content. Here are some key points regarding international image copyright law:

  • Berne Convention for the Protection of Literary and Artistic Works: The Berne Convention, established in 1886 and revised several times since then, is one of the cornerstone treaties in international copyright law. It sets minimum standards for copyright protection among its member countries and establishes the principle of automatic copyright protection upon the creation of a work.

  • Universal Copyright Convention (UCC): The UCC is another international copyright treaty that provides a framework for copyright protection, especially for countries that are not members of the Berne Convention. It offers similar protections as the Berne Convention but with some differences in its requirements.

  • Copyright Duration: The duration of copyright protection varies between countries, but the general trend is towards longer protection periods. In most countries, copyright protection lasts for the life of the author plus a certain number of years after their death. However, the exact duration can vary, and some countries also have different rules for works created by corporations or anonymous authors.

  • Fair Use and Fair Dealing: Many countries have provisions in their copyright laws that allow for the limited use of copyrighted works without permission for purposes such as criticism, commentary, news reporting, teaching, scholarship, or research. These provisions are often referred to as "fair use" (in the United States) or "fair dealing" (in other countries).

  • International Treaties and Agreements: In addition to the Berne Convention and the UCC, there are other international agreements that address copyright issues, such as the Agreement on Trade-Related Aspects of Intellectual Property Rights (TRIPS), which is administered by the World Trade Organization (WTO).

  • Enforcement and Remedies: Enforcement of copyright laws varies between countries and can involve civil and criminal remedies. Civil remedies often include injunctions, damages, and orders for the infringing party to cease their infringing activities. Criminal remedies may involve fines and imprisonment for serious copyright infringement.

  • Digital Environment: The rise of digital technology has posed new challenges to copyright enforcement, particularly with regards to online distribution and sharing of images. International efforts, such as the WIPO Copyright Treaty and the WIPO Performances and Phonograms Treaty, aim to address these challenges and provide a framework for protecting copyrighted works in the digital environment.

It's important to note that while there are international standards and agreements regarding copyright protection, each country has its own copyright laws and regulations, so the specifics of image copyright law can vary from one jurisdiction to another." (Source: ChatGPT 2024)


Copyright Protection of Photographs: a Comparative Analysis Between France, Germany and Italy Kluwer Copyright Blog

Copyright and Fair Use Harvard University

Copyright and Fair Use - Finding Images Duke University

Global Aspects of Copyright University of Saskatchewan

How Image Copyright Laws Differ Internationally: What Every Website Owner Should Know PicDefence

IP and Business: Using Photographs of Copyrighted Works and Trademarks WIPO

Images: Copyright, Licenses and Fair Dealing MacOdrum Library, Carleton University

Image Copyright on Social Media: Everything You Need to Know Hootsuite

Image Right and Copyright Law in Europe: Divergences and Convergences MDPI

Indigenous / Traditional Knowledge & Intellectual Property Duke Law

International Copyright Copyright Clearance Center (CCC)

Is My Copyright Internationally Protected? Artrepreneur

Legally Using Images Copyrightlaws

Photography Copyright Laws across the World: What are the main Differences? Fair Licensing

The Essential Guide to Photography and Copyright Law Format

The International Framework of Copyright Law Berkman Klein Center

The Wider Picture: A Guide To International Image Rights Fladgate

US Copyright Tips For International Photographers PhotoShelter

Understanding Copyright Intellectual Property Office of Ireland

What Every Marketer Needs to Know about Photo Copyright Infringement Trade Press Services

Why copyright matters and important concepts related to copyright Institute of Art, Design and Technology

Image Copyright Information for South African Photographers >>

© Symbol Image: Copyright Free from Pixabay

Canon EF 400mm f/5.6L USM Prime Lens Practice

Canon EF 400mm f/5.6L USM Lens - Fast Shutter Speeds
Canon EF 400mm f/5.6L USM Prime Lens

Canon EF 400mm f/5.6L USM Prime Lens
Objective
: First practice shots with my Canon EF 400mm f/5.6L USM super telephoto prime lens. Canon EOS 700D Body. Various ISO's / Shutter Speeds.

Note: Fast shutter speeds / panning hand-held in Manual. All images processed in Lightroom 5.7. Converted from RAW to JPG. Lens profile correction.

Cape Town Location
Milnerton Lagoon Woodbridge Island, Cape Town

Equipment (Birds In Flight / Action Photography) 

  • Canon EOS 700D SLR camera body 
  • Canon EF 400mm f/5.6L USM prime lens 

Manual Mode Settings

  • Shutter speed: 1/750 - 1/1000s 
  • Aperture: f/6.7 
  • Focal length 400mm 
  • ISO 100-400 
  • No Image Stabilization 
  • Autofocus mode (Centre AF point)
  • Continuous shooting mode / AI Servo
  • Handheld

Affordable Canon 400mm Lens for Birds in Flight Photography >>

Canon EOS 7D Mark II Long-Term Use with the Canon EF 400mm f/5.6L USM Lens >>


Canon EF 400mm f/5.6L USM Telephoto Prime Lens Practice
Canon EF 400mm f/5.6L USM Lens f/6.7 ISO 200 1/750s

Canon EF 400mm f/5.6L USM Telephoto Prime Lens Practice
Canon EF 400mm f/5.6L USM Lens f/6.7 ISO 200 1/1000s

Canon EF 400mm f/5.6L USM Telephoto Prime Lens Practice
Canon EF 400mm f/5.6L USM Lens f/6.7 ISO 500 1/1000s

Canon EF 400mm f/5.6L USM Telephoto Prime Lens Practice
Canon EF 400mm f/5.6L USM Lens f/.6.7 ISO 200 1/1000s

Canon EF 400mm f/5.6L USM Telephoto Prime Lens Practice
Canon EF 400mm f/5.6L USM Lens f/.6.7 ISO 400 1/750s

Canon EF 400mm f/5.6L USM Lens f/.6.7 ISO 400 1/750s

Canon EOS 7D Mark II - Birds in Flight Photo Gallery

The Peregrine Falcon: Fastest Bird in the World

The Peregrine Falcon Cited by Many Sources as the Fastest Flying Bird in the World

What is the Fastest Bird in the World?

Peregrine Falcon Arnhem Milnerton Copyright Vernon Chalmers
 Fast Peregrine Falcon outside my window : Arnhem Milnerton, Cape Town

Image: Peregrine falcon swooped into a dive high outside my bedroom window. (Canon 7D Mark II / EF 400mm f/5.6L USM Lens)

I am very pleased to read that 'my closest neighbour', the Peregrine falcon, is recognised by many bird and animal speed recording websites as the fasted bird (and possibly the fastest animal) in the world. I have looked at quite a few sources, amongst others, Britannica and Guinness World Records. See measurement / speed references and sources below the second image.

Peregrine Falcon Arnhem Milnerton Copyright Vernon Chalmers
Fast Peregrine Falcon flying straight at me : Arnhem Milnerton, Cape Town

Image: Peregrine falcon flying directly at me while watching him through my bedroom window. (Canon 7D Mark II / EF 400mm f/5.6L USM lens)

Over the years I have formed a special bond with the Peregrine falcon. Although it is alarming to see them becoming so urbanised, it is in some ways satisfying to see / hear him often so close to me. Captured in the image above he flew straight at me (probably between 20 to 30 times) while I was standing at my bedroom window on the 12th floor - giving me more than enough time to grab my camera. This incident occurred late one Thursday afternoon  - over and over with such precision (and soul-piercing eyes) that I became concerned he could fly into the room. Many evenings, at dawn, he would perch outside the bathroom window.

Peregrine Falcon Speed Measurement  / Sources:

Measuring a bird or animal speed is by no means an easy and (not always) an accurate measurement, but going through various online sources it seems to be a definite agreement that the Peregrine falcon with a top diving airspeed of +- 300 km/h / 186 mph is the fastest bird.

Britannica "The peregrine falcon is best known for its diving speed during flight—which can reach more than 300 km (186 miles) per hour—making it not only the world’s fastest bird but also the world’s fastest animal." (Source: Britannica)

Guinness World Records "The fastest dive by a bird is that of a peregrine falcon (Falco peregrinus), which has been estimated at reaching a terminal velocity in ideal conditions of approximately 320 km/h (200 mph) when in a diving stoop hunting prey on the wing. Some experimental dives have suggested that even higher speeds are possible by this species, perhaps up to 389 km/h (242 mph)." (Source: Guinness World Records)

BirdFact "The fastest bird in the world is the migratory peregrine falcon. These raptors feed on other birds like pigeons and shorebirds that they capture in flight at amazing speeds of up to 200 miles per hour. They achieve this speed by diving or stooping from above, using a combination of powerful flight muscles, perfectly streamlined form, and good old gravity." (Source: BirdFact)

The Peregrine Falcon: Fastest Bird in the World
Peregrine Falcon Outside My Window : Arnhem, Milnerton

The Peregrine Falcon (Falco peregrinus) is indeed recognized as the fastest bird in the world and one of the fastest animals on the planet. Here are some key points about the Peregrine Falcon's remarkable speed:

The Peregrine Falcon: Fastest Bird in the World : Facts about (Falco peregrinus)

1. Diving Speed
  • The Peregrine Falcon achieves its incredible speed during high-speed dives, or "stoops," when it is hunting prey. In a dive, it can reach speeds of over 240 miles per hour (386 kilometers per hour).

2. Adaptations for Speed
  • The Peregrine Falcon has several adaptations that contribute to its speed, including streamlined aerodynamics, powerful flight muscles, and a specialized respiratory system that allows for efficient oxygen intake during high-speed pursuits.

3. Hunting Technique
  • When hunting, the Peregrine Falcon climbs to a great height and then goes into a rapid, steep dive to strike its prey. It tucks its wings close to its body during the dive, minimizing air resistance.

4. Range and Distribution
  •  Peregrine Falcons are found on every continent except Antarctica. They are adaptable birds and can be seen in a variety of habitats, from urban areas to mountainous regions.

5. Diet
  • Their diet primarily consists of other birds, and their speed is a crucial asset when hunting agile prey in the air. Peregrine Falcons are known for preying on birds in flight, often striking them mid-air.

6. Conservation Status
  • The Peregrine Falcon faced significant population declines in the mid-20th century due to the use of certain pesticides, particularly DDT. Conservation efforts, including the banning of DDT and the implementation of breeding programs, have led to the recovery of Peregrine Falcon populations in many regions.

7. Nesting and Behavior
  •  Peregrine Falcons build nests on cliffs, ledges, or tall structures such as buildings and bridges. They are known for their courtship displays, which involve aerial acrobatics.

8. Subspecies
  •  There are several subspecies of Peregrine Falcons, adapted to different regions and habitats. Some subspecies are migratory, covering vast distances during their migrations.

Observing the Peregrine Falcon in action, especially during its high-speed dives, is a testament to the remarkable adaptations that have evolved in these birds for efficient and rapid flight. They are a symbol of both natural prowess and successful conservation efforts. (Source: ChatGPT 2023)

Peregrine Falcon Arnhem Milnerton Copyright Vernon Chalmers
Peregrine Falcon watching me : Arnhem Milnerton, Cape Town

Image: Peregrine falcon watching me on a Saturday afternoon. The best stalker I have ever had.(Canon 70D / EF 400mm f/5.6L USM lens)

Above Images Location: Arnhem / Milnerton, Cape Town (opposite Woodbridge Island)

Peregrine Falcon - Bird Slayer and Dive Master! The Fastest Animal on the Planet


Peregrine Falcon: How the Fastest Animal on Earth Attacks Its Prey : Video


The Peregrine falcon is not your average avian predator. When hunting, this remarkable bird will fly to great heights, then dive bomb its prey abruptly at speeds of up to 242 mph. 

From: DAVID ATTENBOROUGH'S CONQUEST OF THE SKIES: Triumph

Sourcehttp://bit.ly/1UO4Kai

The 10 Top Fastest Birds in the World (indicated in Miles / Kilometres Per Hour)

Vernon Chalmers Photography Training Intaka Island | Kirstenbosch Garden | Woodbridge Island

Tips | Settings for New Year's Eve Fireworks Photography

How to Shoot a Fireworks Display : Bulb Mode / Long Exposure Photography 

Canon EOS Bulb Mode Settings for Photographing Fireworks 

Tips / Settings for New Year's Eve Fireworks Photography
Fireworks Photography : Canon EOS 700D / EF 70-300mm f/4-5.6 IS USM Lens

Getting ready for capturing NYE Fireworks? A few quick tips / settings to get new photographers going with photographing firework displays. 

How to shoot NYE Fireworks?

Canon EOS DSLR Settings for attached photographs:
  • Bulb Mode
  • Shutter Speed +- 4 - 6 seconds
  • Aperture f/8 - f/11
  • IS0 100 - 200
  • Manual focus
  • RAW

A sturdy tripod is essential. I've used a cable release (optional). No built-in or Speedlite flash.

More Firework Photography Images >>

Any DSLR's should be good to go (most compacts as well).

Lens selection will be distance-dependent. Setup +- 30 minutes before the event and take a few test shots.

Canon Tips | Settings for New Year's Eve Fireworks Photography
Fireworks Photography : Canon EOS 700D / EF 70-300mm f/4.5-5.6 IS USM lens

Fireworks / Long Exposure Image Below: I've used my Canon EOS 6D / EF 70-300mm f/4-5.6L IS USM lens at +- 250mm (app 1.5 kilometres from fireworks over Woodbridge Island towards the V&A Waterfront, Cape Town - captured from Arnhem Milnerton).

Best Vantage Points for Cape Town NYE Fireworks (not close to the V&A Waterfront)
Should you wish not to drive / go into the V&A Waterfront, Cape Town for photographing the NYE Fireworks, the Milnerton areas between Lagoon Beach and Milnerton Beach (Woodbridge Island) should provide for plenty opportunities for setting up tripods (with a clear view towards the V&A Waterfront).

Lagoon Beach / Milnerton Beach / Woodbridge Island, Cape Town Google Map

Tips / Settings for New Year's Eve Fireworks Photography
Canon EOS 6D / EF 70-300mm f/4-5.6L IS USM Lens : V&A Waterfront, Cape Town NYE
Fireworks Display 

Long Exposure / Night Photography Setup & Tips View

How To Photograph Fireworks - Night Photography

How To Photograph Fireworks - Advanced Night Photography (YouTube Video)


Canon Long Exposure | Night Photography | Fireworks Setup & Tips
Canon Long Exposure | Night Photography | Fireworks Setup & Tips >>

New Year 2014 Fireworks with Canon EOS 700D - View >>

New Year 2014 Fireworks Cape Town with Canon EOS 700D / EF-S 18-135mm lens Photo: Vernon Chalmers
Canon EOS 700D / Canon EF-S 18-135mm lens

Criteria for Capturing a Good Photograph

Awareness of the Criteria and Elements in the Making of Great Photographs 

Criteria for Capturing a Good Photograph

You don't make a photograph just with a camera. You bring to the act of photography all the pictures you have seen, the books you have read, the music you have heard, the people you have loved.” ― Ansel Adams

A personal 'visit' to ChatGPT provided objective and universal lists for assisting the developing / competitive photographer with the awareness of various criteria for creating ideal images for self, others and photography judges (when entering photo competitions irrespective of genre). 

Capturing a Good Photograph
"Capturing a good photograph involves a combination of technical skills, artistic creativity, and attention to detail. Here are some key criteria to consider when aiming for a great photograph:

Composition:
  • Rule of Thirds: Divide your frame into a 3x3 grid and place your subject or key elements along the gridlines or at their intersections.
  • Leading Lines: Use lines within the scene to lead the viewer's eye to the subject.
  • Framing: Use natural elements or objects in the foreground to frame the subject and draw attention to it.
  • Symmetry and Patterns: Seek out symmetry or interesting patterns in your composition.

Lighting:
  • Quality of Light: Pay attention to the direction and quality of light. Soft, diffused light is often preferable for portraits, while dramatic light can work well for landscapes.
  • Golden Hour: Shoot during the golden hours of early morning or late afternoon for warm, soft lighting.Avoid harsh shadows and overexposure by adjusting your exposure settings.

Focus and Sharpness:
  • Ensure your subject is in sharp focus.
  • Use the appropriate autofocus mode or manual focus.
  • Use a tripod or stabilize your camera to prevent camera shake and maintain sharpness, especially in low-light situations.

Exposure:
  • Balance exposure settings (aperture, shutter speed, ISO) to achieve the desired level of brightness and depth of field.
  • Understand the exposure triangle and how different settings affect your image.

Color and White Balance:
  • Pay attention to color temperature and white balance settings to ensure accurate and pleasing colors.
  • Consider the emotional impact of color in your composition.

Perspective and Angle:
  • Experiment with different angles and perspectives to create unique and engaging compositions.
  • Try shooting from high or low angles, or using unconventional viewpoints.

Storytelling and Emotion:
  • Think about the story or emotion you want to convey through your photograph.
  • Capture genuine expressions and moments to evoke emotions in viewers.

Subject:
  • Choose a compelling subject that is interesting, relatable, or visually striking.
  • Consider the background and foreground to ensure they complement the subject.

Post-Processing:
  • Use photo editing software (e.g., Adobe Lightroom, Photoshop) to enhance and refine your images.
  • Avoid over-processing; aim for a natural look unless a specific artistic effect is desired.

Timing and Patience:
  • Be patient and ready to capture the right moment, especially in genres like wildlife or street photography.
  • Anticipate action or changes in lighting.

Technical Details:
  • Pay attention to technical aspects like image resolution, file format, and image stabilization.
  • Ensure your equipment (camera, lenses, accessories) is in good working condition.

Personal Style:
  • Develop your own unique style and artistic vision that sets your work apart from others.
  • Experiment and be open to creative risks.

Remember that these criteria can vary depending on the type of photography you are pursuing (e.g., portrait, landscape, macro, street). Ultimately, capturing a good photograph is about creating an image that resonates with you and your audience while effectively conveying the intended message or emotion. Practice, patience, and a critical eye are essential for improving your photography skills over time." (Source: ChatGPT 2023)

What Photography Judges Evaluate in Photo Competitions / Contests

"Photography judges in photo competitions evaluate various aspects of an image to determine its quality and whether it deserves recognition. While the specific criteria can vary depending on the competition and its rules, here are some common factors that judges typically consider when evaluating photographs:

1. Composition: Judges assess how well the elements within the frame are arranged. They look for balance, use of the rule of thirds, leading lines, framing, and overall visual organization.

2. Creativity and Originality: Judges appreciate unique and innovative approaches to subjects or scenes. They are drawn to photographs that stand out through creative composition, perspectives, or storytelling.

3. Technical Skill: A photograph's technical aspects are critical. Judges evaluate sharpness, exposure, color balance, and overall technical proficiency. They consider whether the photographer effectively used camera settings (e.g., aperture, shutter speed, ISO) to achieve the desired result.

4. Subject Matter: Judges consider the choice of subject and its relevance to the theme or category of the competition. A compelling and interesting subject can significantly impact the judging process.

5. Emotion and Impact: Successful photographs often evoke emotions or leave a lasting impression. Judges assess how well the image captures and conveys emotions, stories, moods, or a sense of place.

6. Storytelling: In some competitions, storytelling is a key criterion. Judges evaluate whether the image tells a compelling and coherent story or captures a decisive moment.

7. Technical Details: Attention to detail is important. Judges look for well-executed post-processing, clean editing, and a lack of distracting or unintended elements.

8. Creativity in Editing: If post-processing is allowed, judges may consider how creatively and effectively the photographer used editing techniques to enhance the image without overdoing it.

9. Adherence to Rules: Judges ensure that entries adhere to the rules and guidelines of the competition, including any restrictions on editing or manipulation.

10. Overall Impact: Judges evaluate the overall impact of the image as a whole. They consider how all the elements work together to create a visually compelling and memorable photograph.

11. Technical Challenges: In some competitions, judges may recognize and reward photographs that successfully overcome technical challenges or demonstrate exceptional technical skill.

12. Consistency (in a series): In competitions involving a series of images, judges may evaluate how well the images work together as a cohesive body of work.

13. Relevance to Theme or Category: If the competition has a specific theme or category, judges assess how well the entry aligns with that theme or category.

Keep in mind that judging criteria can vary from one competition to another, and judges' preferences may differ. Photographers entering competitions should carefully read the rules and guidelines provided by the competition organizers and consider these criteria when preparing their entries. Additionally, judging often involves some degree of subjectivity, as judges bring their own perspectives and experiences to the evaluation process." (Source: ChatGPT 2023)

Images Source: Pixabay (Open Source)

The Theory of Photography

BIO-AIRE – Rehabilitating Polluted Water

When Mother Nature calls and man has to unfortunately intervene…

BIO-AIRE – Rehabilitating Polluted Water
Pied Kingfisher fishing in the Diep River, Woodbridge Island

Western Cape-based contractor, Khubeka Construction, has developed an innovative, cost-effective and environmentally friendly means of rejuvenating and maintaining wastewater sludge ponds, waterways and dams that have become overloaded and lifeless due to pollution.

At some point in its life, every wastewater treatment pond will need the introduction of positive aeration to stimulate the natural eco-system within. Sometimes, though, the build-up is too extensive, and the intervention too late to carry out a routine replenishment process.

That’s when a more intensive and natural approach is required, but as Mark Rennie from Khubeka Construction explains, “Conventional techniques using high-powered pumps can be prohibitively expensive.” In response, Khubeka have developed a low-cost solution that is achieving sustainable results, underscored by a recent pilot project at George’s Gwaing waste water treatment works (WWTW).

“Where we’ve been called in to assist on treatment works remediation projects in the past, what we’ve frequently encountered is a situation where municipal maturation/oxidation ponds are typically ‘sludged-up’, often as a result of many years of use.

This can be compounded by power failures that cause uncontrolled raw effluent discharge into these ponds. The result is that these should be eco-friendly systems become completely overloaded, and eventually, septic,” Rennie explains.

“This scenario commonly occurs in rural and small towns. However, there are cases where large cities have a similar problem. Either way, the sludge needs to be removed.”

There are two methods that can be applied: either mechanically pumping the sludge out of the pond; or going the biological intervention route to break down the bio-solids.

(Click / Tap to Enlarge)
 
BIO-AIRE – Rehabilitating Polluted Water
Bio-Aire : Bringing Sludge Ponds, Rivers and Waterways Back To Life  

Aerobic alternative: Pros and Cons

As opposed to mechanical extraction, a pure biological intervention – by pumping in a range of aerobic bacteria – would seem the most viable alternative, and it can be, given certain conditions. However, Khubeka has encountered a number of problems with this method.

“The initial cost is cheap. However, to maintain the system using bacteria becomes expensive over time. Plus, large pumps are needed to effectively mix the bacteria into the sludge, and to ‘turn’ the pond over. What also happens in this case is that the sludge becomes suspended, and then usually spills into the final discharge area, namely the river or wetland, with negative downstream results.”

A system that works - Bio-Aire

Practical experience, combined with these observations, motivated Khubeka to develop its unique product, which is aimed at any industry that discharges organic wastewater for treatment or polishing. Khubeka has designed a 3 kW and 6 kw unit depending on the application – which are inexpensive to operate compared to conventional aerators and mixers, plus the system is mobile. The square-shaped aeration unit that sits in the water is made up of internal chambers and has no moving parts.

The only part that requires any maintenance is the 3-phase blower, which is land- based. The system employs fine bubble aeration to move the water using an air lift principle, which attains the massive volumes required.

Remarkably, the Bio-Aire units are capable of moving approximately 15 million litres of water within a 24-hour period. The water is aerated as it passes through the unit and in the process increases the dissolved oxygen in the pond. The growth of native bacteria in the pond then begins feeding on the sludge and reduces it, similar to the natural dams and waterways.

During the pilot project at Gwaing WWTW, the sludge volume was reduced by at least 60% in just two months on one of the plant’s four ponds. The pond in question, which is now fully reinstated, measures 250 m in length and is 40 m wide with a depth of 1 to 1.5 m.

Having ‘brought this pond back to life’ there is now evidence of emerging aquatic life, like tadpoles, plus a resurgence in bird activity. The dead zone has come back to the top of the pond, plus the smell is now virtually odourless.

“We are currently in discussions with other Western Cape municipalities where we’re experiencing strong interest,” adds Rennie. “We are also planning to return to Gwaing when their new financial year commences to de-sludge their three remaining ponds.”

If we can achieve these results within raw sewage ponds, just imagine what Bio-Aire can do for our natural rivers and dams that are continuously being polluted by man.

Sewage Problems at Milnerton Lagoon, Woodbridge Island

Milnerton Lagoon - Remediation with Bio-Aire (Video)


For more information contact Mark Rennie: 082 8885778

About Khubeka Construction
Khubeka Construction is a Civil & Building Company established in June 2001.We specialise in construction of water retaining structures, sewage and water treatment works. During 2016 while constructing a waste treatment works, we saw a need for a cost effective and efficient water aeration system, from 2016 to 2019 we developed our unique water treatment system and in 2020 began commercialising and selling the units.

Bio-Aire was born out of seeing an inherent need to develop a water treatment system for the South African environment, although we designed our system for the harsh South African conditions it is also well suited for use worldwide.

Many of the current treatment systems are too complicated to operate, are power intensive and are prone to costly breakdowns and maintenance, which in most instances leads to water treatment systems not being used correctly or not being used at all.

Bio-Aire is unique in that it is cost effective, efficient, easy to operate and deploy and can be maintained and operated at an 80% reduced cost versus similar systems.

Khubeka Construction is currently a Level One BBBEE Contributor.

Published with Permission from Mark Rennie Khubeka Construction

When and Why to use a Tripod in Photography

 Vernon Chalmers Photography Training Cape Town
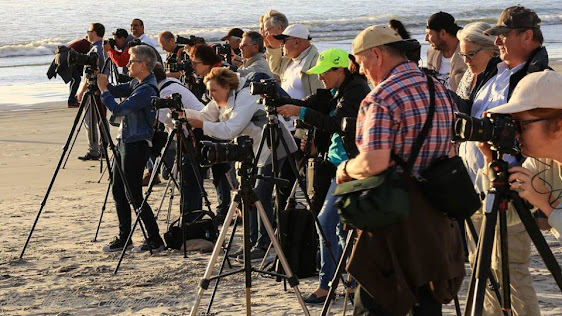
When and Why to use a Tripod in Photography
Vernon Chalmers Photography Students Using Tripods *

A tripod is a versatile tool that photographers use to stabilize their cameras and achieve sharper images in various situations. Here are some common scenarios and reasons to use a tripod in photography:

1. Long Exposures: When capturing scenes that require longer exposure times, such as landscape photography or night photography, a tripod becomes essential. It helps keep the camera perfectly still during the exposure, preventing blurring caused by camera shake. This is especially important when using slower shutter speeds to capture motion blur or low-light scenes.

2. Low-Light Situations: In dimly lit environments where you need to use a slower shutter speed to capture enough light, a tripod is invaluable. It allows you to maintain stability while avoiding camera shake, resulting in sharp images without relying on high ISO settings or artificial lighting.

3. Macro Photography: When shooting extreme close-ups or macro photography, depth of field becomes very shallow. The slightest movement can cause a loss of focus. A tripod ensures that your camera remains steady, allowing you to precisely position and focus on the subject while using smaller apertures for increased depth of field.

4. Landscape Photography: Tripods are widely used in landscape photography because they provide stability and allow photographers to carefully compose their shots. With a tripod, you can take your time to find the perfect composition, adjust framing, and maintain consistent framing for multiple exposures, such as when creating panoramas or HDR images.

5. Telephoto Lenses: Telephoto lenses have a narrower field of view and magnify camera movement, making them more susceptible to shake. Mounting your camera on a tripod helps stabilize the system and allows you to use longer focal lengths while maintaining sharpness.

6. Self-Portraits and Group Photos: Tripods are excellent for self-portraits and group photos because they eliminate the need for someone else to hold the camera. You can set up the tripod, use a self-timer or a remote shutter release, and ensure everyone is in the frame without any rushing or compromising image quality.

7. Precise Composition: A tripod gives you precise control over framing and composition. It enables you to make fine adjustments to the camera's position and maintain consistency between shots. This is particularly useful in situations where you need to compare or merge multiple images, such as for focus stacking or exposure bracketing.

8. Video Recording: If you're shooting video, a tripod is indispensable for stable footage. It allows you to pan smoothly, follow subjects with ease, and maintain a consistent frame. Some tripods even have dedicated fluid heads for smoother camera movements.

In summary, a tripod is beneficial in photography whenever stability, sharpness, precise composition, or prolonged exposures are required. It enhances image quality, expands creative possibilities, and helps you capture better photos in a variety of shooting situations." (Source: ChatGPT 2023)

Photography Private Training Cape Town

  • Introduction to Photography / Canon Cameras More 
  • Birds in Flight Photography Training More
  • Bird Photography Training Kirstenbosch More
  • Canon EOS Autofocus / AI Servo Master Class More
  • Birds in Flight Photography Workshop More
  • Canon Speedlite / Ring Lite Flash Photography Workshop More
  • Macro / Close-Up Photography Workshop Cape Town More
  • Landscape / Long Exposure Photography Workshop More
  • Real Estate / Interior Decor Photography Training More
  • Samsung Galaxy Smartphone Photography Training More
  • Digital Workflow / Lightroom Post-Processing Workshop More

* Image Credit: Steve Williams (Vernon Chalmers Landscape Training Milnerton Beach, Cape Town)

Vernon Chalmers Photography
 Training Intaka Island | Kirstenbosch Garden | Woodbridge Island

22 July 2024

Introducing the Canon EOS R1 and the Canon EOS R5 Mark II

Introducing the Canon EOS R1 and EOS R5 Mark II Cameras : Official Canon Video


Canon EOS R1 and Canon EOS R5 Mark II

On July 17th, Canon unveiled the new flagship for the R system – the Canon EOS R1 and the Canon EOS 5D Mark II Canon Europe Media Release

With its new imaging platform, Action Priority AF and countless new features, it is perfect for demanding sports and action photography and hybrid photo/video creatives. Canon Ambassador, Alex Grymanis, talks through his experience shooting the launch, and product specialist Tibor Szövetes explains the top features of this stunning new camera. In addition, the best just got better – the Canon EOS R5 Mark II with its new 45mp backside illuminated sensor, 8k 60p filmmaking capabilities and simultaneous photo and video modes is the go-to choice for those who want to master the moment.

Filmmaker and director, Ant Rubinstein, talks through what it was like to create with the camera, and product specialist, Aron Randhawa, goes in-depth on why this is the ultimate tool for hybrid content makers. And finally, we took a look at the wider R system – the new Canon EOS C400 for pro-filmmakers, the RF-S 3.9mm F3. 5 STM Dual Fisheye APS-C VR lens and new hybrid RF 35mm F1.4L VCM lens. (Source: Canon Europe)

Canon EOS R1: https://canon.sm/4f6sRxy

Canon EOS R5 Mark II: https://canon.sm/3LogajZ

Video Contents
  • Canon EOS R System Recap
  • Canon EOS R1 Intro
  • Canon EOS R1 Tech Run Through
  • Canon Alexandros Grymanis on the EOS R1
  • Canon EOS R5 Mark II Intro
  • Cabob EOS R5 Mark II Tech Run Through
  • Anthony Rubinstein on the Canon EOS R5 Mark II
  • Canon EOS C400
  • Canon RF-S 3.9mm F3.5 STM Dual Fisheye Intro
  • Canon RF-S 3.9mm F3.5 STM Dual Fisheye Film

11 July 2024

Peregrine Falcon outside my Window

Returning Peregrine Falcon to Milnerton, Woodbridge Island

Peregrine falcon sleeping in my Window

For many, this image, may not hold any real significance, but for the observant of 'my' (any) Peregrine falcon, this is a worthwhile silhouette.

During the past week, my closest neighbour, the Peregrine falcon, 'came home’, to his bathroom window preference, much earlier than usual. Can’t fault him, he also departed much later in the morning, 08:45+ vs. 05:30 lately.

Can’t blame him... here in Cape Town - with the current winter weather. He's been 'sleeping-in' for a few mornings lately. First time ever...

What he did manage to achieve (constantly) was a nightly state of ‘Load Shedding’ around him (ito my own living arrangements). It’s ‘lights-out’ when he is here – and that is about every night. The fridge light is (the) maximum light…

Peregrine falcon with Canon EOS 70D / EF 100mm f/2.8 Macro USM lens @ f/2.8 in Manual Mode (way past sunset during this week).

Arnhem, Milnerton, Cape Town. (12 Floors above Loxton Road)

The Peregrine Falcon: Fastest Bird in the World

Peregrine Falcon with Catch Outside My Window

Returning Peregrine Falcon to Milnerton, Woodbridge Island

The Pedigree Falcon, one or the Top Flying Birds in the World

01 July 2024

Vernon Chalmers Photography Training Map | Directions

Vernon Chalmers Photography Training Location Map (Opposite Woodbridge Island)

Woodbridge Island Milnerton Cape Town Google Map and Directions

Vernon Chalmers Photography Address
1204 Arnhem
6 Loxton Road
Milnerton, Cape Town

Vernon Chalmers Direct Contact


Canon EOS Camera Training / Photography Workshops Cape Town, Cape Peninsula 
Please Contact Me for discussing specific Canon EOS Camera / Photography learning requirements. I am available to travel to specific locations for one-day and longer workshops.

Learn Canon Photography from the comfort of your own Home / Garden More Information

Bird / Flower Photography Training Kirstenbosch National Botanical Garden Kirstenbosch Photography

For general workshop information view / visit Photography Workshops Cape Town

Sandwich Tern  :  Milnerton Lagoon / Woodbridge Island
Sandwich Tern  :  Milnerton Lagoon / Woodbridge Island

Canon Photography Training Milnerton Woodbridge Island | Kirstenbosch Cape Town

Canon EOS Official Sample Image Links: 2014 - 2024

Canon EOS / Canon EOS R Official Sample Images from Canon Japan
 
Canon EOS Official Sample Image Links: 2014 - 2019 Image: Canon EOS RP Official Sample
Canon EOS RP Sample Image : Image Credit Canon Singapore

I study 100's of new Canon EOS R / EOS camera official sample images as new bodies are released - the attached image above is from the Canon EOS RP Full-Frame Mirrorless camera.

Herewith a list / link to various Canon EOS R / EOS / EOS M camera sample galleries on one of my websites of sample images from most of the current APS-C and Full-Frame Canon bodies 

2014 - 2024

Latest Sample Images: Canon EOS R6 Mark II | Canon EOS R7 | Canon EOS R10

Canon EOS R Official Sample Images

 As made available by Canon Japan (also other official Canon subsidiaries) and published on my Canon Camera News website - with image credits and original EXIF Data and Image Downloads:

Canon EOS R Full-Frame Sample Images
  • Canon EOS R1
  • Canon EOS R3
  • Canon EOS R5 Mark II
  • Canon EOS R5 C
  • Canon EOS R5
  • Canon EOS R6 Mark II
  • Canon EOS R6
  • Canon EOS R8
  • Canon EOS R
  • Canon EOS RP

Canon EOS R APS-C Sample Images
  • Canon EOS R7
  • Canon EOS R10
  • Canon EOS R50

Canon EOS / EOS M Official Sample Images

 As made available by Canon Japan (also other official Canon subsidiaries) and published on my Canon Camera News website - with image credits and original EXIF Data and Image Downloads:
  • Canon EOS-1D X Mark III
  • Canon EOS-1D X Mark II
  • Canon EOS 5D Mark IV
  • Canon EOS 5D Mark III 
  • Canon EOS 6D Mark II
  • Canon EOS 7D Mark II
  • Canon EOS 90D
  • Canon EOS 80D
  • Canon EOS 77D
  • Canon EOS Rebel T8i / EOS 850D
  • Canon EOS Rebel T7i / EOS 800D
  • Canon EOS 750D / 760D (Rebel T5i / T5s)
  • Canon EOS 4000D
  • Canon EOS 2000D
  • Canon EOS SL3 / EOS Rebel 250D 
  • Canon EOS SL2 / EOS Rebel 200D
  • Canon EOS M100 Mirrorless
  • Canon EOS M50 Mirrorless
  • Canon EOS M5 Mirrorless
  • Canon EOS M6 Mark II Mirrorless
  • Canon EOS M6 Mirrorless

Go>>
Canon EOS Official Sample Image Links


Canon EOS 760D Rebel T6s Sample Image  - Image Credit: Canon Japan EXIF DATA
Canon EOS 760D Rebel T6s Sample Image  - Image Credit: Canon Japan EXIF Data

Sample Image: Canon EOS 4000D - Image Credit Canon Japan
Sample Image: Canon EOS 4000D - Image Credit: Canon Japan EXIF Data

Using Auto-ISO for Fast Birds in Flight Photography

Canon ISO Settings for Fast  / Small Birds In Flight Photography

Auto ISO Study for Birds in Flight / Fast Action Photography

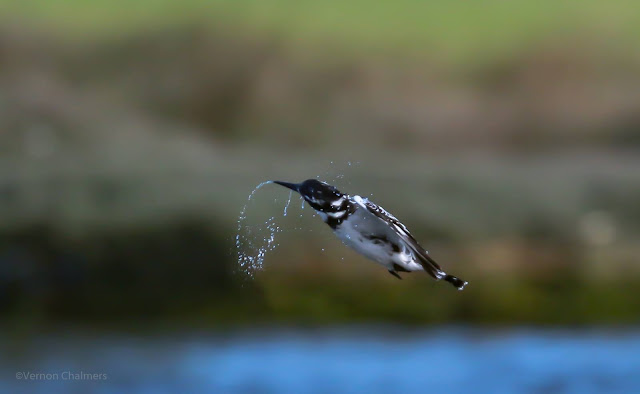
Record shots: Pied Kingfisher in flight  : Over the Diep River / Woodbridge Island

I am continuously researching the application of Auto-ISO in Birds in Flight photography and would like to share a few images captured with the Canon EOS 70D / EF 70-300mm f/4-5.6L IS USM Lens - demonstrating the modern DSLR's ability for making ISO changes (when Auto-ISO is enabled).

Note: My own field study is based on the relationship between BIF photography (high shutter speed action shooting / continuous AF tracking) and the modern DSLR's Auto-ISO function and will not (necessarily) apply for static subjects (i.e. perched birds) - although, I use the same settings when shooting perched birds (when out doing Birds in Flight photography in good light).

The Canon EOS 70D (APS-C / crop body) is not really recognized as a Canon-recommended high-end body (in the same way as the EOS 7D Mark II (2014) and higher were at the time of Canon's 2013 Auto-ISO publication) for shooting Auto-ISO in Manual and the Semi-Auto Modes (Av = Aperture Priority / Tv = Shutter Priority Modes).

Nevertheless, I went out with the EOS 70D on Auto-ISO for testing / demonstrating the typical enthusiast camera's ability for auto-adjusting ISO's in a low-light and fast-changing background shooting environment.

Auto-ISO is an auto-application that is by far quicker than what I would have achieved with any fix ISO’s when other exposure objectives / settings are (i) a fix Aperture and (ii) a fix Shutter Speed in Manual Mode.

I keep a close eye on about every Auto-ISO reading in the viewfinder before pressing the shutter, but generally it is very effective – or at least acceptable for editing in post-processing later (even in inclement weather and fast-changing backgrounds).

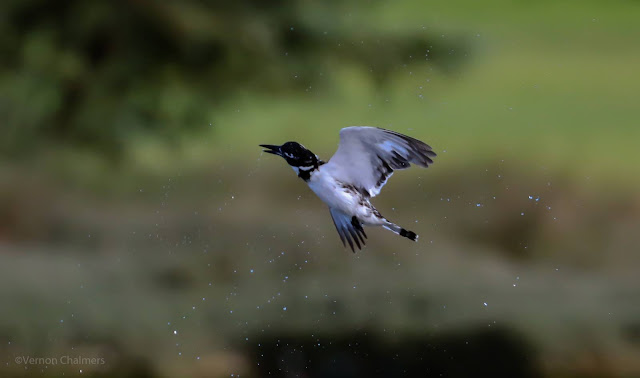
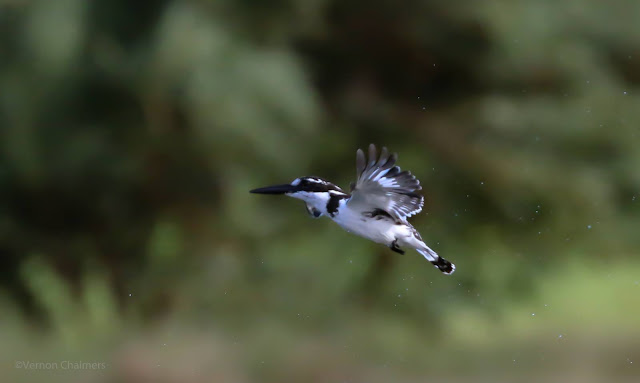
Each of the 4 consecutive frames exposed at different ISO's as the small / erratic bird moved quickly against a lighter to a darker background:

Image 1
 ISO 1000
Image 2 ISO 1600
Image 3 ISO 2000
Image 4 ISO 2500

Canon Gear

  • Canon EOS 70D
  • Canon EF 70-300mm f/4-5.6L IS USM Lens

Exposure Settings

  • Manual Mode
  • Aperture: f/5.6
  • ISO: Auto ISO (1000 - 2500)
  • Shutter Speed:1/5000s

Autofocus (AF) Settings
  • AI Servo
  • Continuous Shooting: 7 fps
  • Zone Selection
  • Handheld

Focal Length
: 300mm

Lightroom 6 Post-Processing
Minimal post-processing (+- 50% crop / slight exposure correction / lens profile correction)

Cape Town Location
Pied Kingfisher at the Pump Station Diep River / Woodbridge Island

Shooting Conditions
Low-light / overcast conditions

Poor light and Canon RF fix / small aperture long lenses may want the developing photographer to experiment more. Using i.e. the Canon RF 600 f/11 IS STM lens  /  Canon RF 800 f/11 IS STM lens in poor light (using Auto-ISO) may render somewhat unacceptable high ISO's for bigger / darker birds (depending on the background). Even with the latest EOS R Full Frame cameras the ISO's may be too high to properly correct in post-processing. Just something to keep in mind. I use a fix ISO for these small aperture lenses (as said example above) - by using a fix ISO 640 the in0flight results were acceptable. For apertures between i.e. f/4 - f/6.3 (whatever the weather) I use Auto-ISO (in Manual Mode - and try and keep (tweak) an average Shutter Speed of between 1/2500 - 1/3200 for fast(er) birds (irrespective of the light). Again: all will depend on body / lens / conditions / subjects.

Findings
A significant finding is the rapid change in ISO 1000 to 2500 (between the 4 continuous frames) as the camera is attempting an ideal exposure.

There are interesting observations (even from the attached record shots why the Auto-ISO moves from ISO 1000 to ISO 2500 in such rapid succession).

Conclusion
From this stage about 8 years ago I always use Auto-ISO for most of my Birds in Flight photography (also reading extensively about the manufacturer's reasoning and motivation for using Auto-ISO for high-speed action such as Birds in Flight). Some of the only exceptions were while testing the fix aperture (f11) Canon RF 600 / RF 800mm lenses in inclement weather (while evaluating the Canon R6 for Canon SA for Birds in Flight photography)

© Vernon Chalmers Photography

Using Auto-ISO for Fast Birds in Flight Photography
"Using Auto-ISO for fast birds in flight photography can be a helpful technique, especially in situations where lighting conditions are changing rapidly, and you want to maintain a fast shutter speed to freeze the motion of the birds. Here are some considerations and tips for using Auto-ISO effectively:

1. Understand Auto-ISO
  •  Auto-ISO allows the camera to automatically adjust the ISO setting based on the available light while keeping the shutter speed and aperture within the specified range.

2. Set Shutter Priority Mode
  • Use Shutter Priority (Tv or S) mode on your camera. This allows you to set the desired shutter speed while the camera adjusts the aperture and ISO automatically.

3. Choose a Fast Shutter Speed
  • Select a fast shutter speed to freeze the motion of fast-flying birds. Shutter speeds of 1/1000 second or faster are often necessary for birds in flight.

 4. Set Minimum Shutter Speed in Auto-ISO Settings
  • Many cameras with Auto-ISO allow you to set a minimum shutter speed. This prevents the ISO from dropping too low and risking motion blur. Set the minimum shutter speed to a value that ensures sharp images.

5. Monitor ISO Range
  • Be aware of the ISO range that your camera is using in Auto-ISO mode. If the ISO goes too high, it can introduce noticeable noise in the images. Find a balance that provides acceptable image quality.

6. Test and Adjust
  • Experiment with different settings in various lighting conditions to see how your camera performs. Adjust the minimum shutter speed and other relevant parameters based on your observations.

7. Use Exposure Compensation
  • In situations where the camera's metering system might be influenced by the background or the bird's coloration, use exposure compensation to adjust the exposure as needed.

8. Shoot in RAW
  • Shooting in RAW format gives you more flexibility in post-processing, allowing you to make adjustments to exposure, noise reduction, and other parameters without compromising image quality.

9. Review Histogram
  • Regularly check the histogram while reviewing your images to ensure that the exposure is well-balanced and that you're not losing details in the highlights or shadows.

10. Consider Manual Mode
  • In situations with consistent lighting, you may opt for Manual mode, setting both aperture and shutter speed manually while adjusting ISO as needed.

11. Focus and Composition
  • Pay attention to autofocus settings and practice tracking fast-moving birds. Additionally, consider the composition and background to create visually appealing images.

Using Auto-ISO in conjunction with Shutter Priority mode can be a powerful tool for capturing birds in flight, allowing you to focus on composition and tracking while the camera adjusts to changing light conditions. Experimentation and familiarity with your camera settings are key to mastering this technique." (Source: ChatGPT 2023)

Auto ISO Study for Birds in Flight Photography
Image 1: ISO 1000 - Auto-ISO for Birds in Flight Photography (Canon EOS 70D)

Auto ISO Study for Birds in Flight Photography
Image: ISO 1600 - Auto-ISO for Birds in Flight Photography (Canon EOS 70D)

Auto ISO Study for Birds in Flight Photography
Image 3: ISO 2000 - Auto-ISO for Birds in Flight Photography (Canon EOS 70D)

Auto ISO Study for Birds in Flight Photography
Image 4: ISO 2500 - Auto-ISO for Birds in Flight Photography (canon EOS 70D)

Low Light / High ISO Shooting Canon EOS 7D Mark II Cape Town View

Birds in Flight Photography Cape Town View